Canvas の練習 : 1
<html>
<head>
   <title>Sample</title>
   <meta http-equiv="X-UA-Compatible" content="IE=edge"/>
   <script>
       function init(){

           var canvas = document.getElementById("canvas");
           var ctx = canvas.getContext("2d");
           ctx.strokeStyle = "#ff0000";
           ctx.lineWidth = 4;
           ctx.beginPath();
           ctx.moveTo(20, 20);
           ctx.lineTo(200, 100);
           ctx.lineTo(200, 200);
           ctx.closePath();
           ctx.stroke();

           ctx.fillStyle = "#0000ff";
           ctx.beginPath();
           ctx.moveTo(220, 20);
           ctx.lineTo(400, 100);
           ctx.lineTo(400, 200);
           ctx.closePath();
           ctx.fill();

           var canvas2 = document.getElementById("canvas2");
           var ctx = canvas2.getContext("2d");
           ctx.fillStyle= "#00ff00";
           ctx.fillRect(10, 10, 180, 200);
           ctx.fill();

           ctx.strokeStyle = "#0000ff";
           ctx.strokeRect(220, 10, 180, 200);
           ctx.stroke();

           var canvas3 = document.getElementById("canvas3");
           var ctx = canvas3.getContext("2d");

           ctx.fillStyle = "#00ff00";
           ctx.beginPath();
           ctx.arc(100, 100, 80, 0, Math.PI * 3/2);
           ctx.fill();

           ctx.strokeStyle = "#0000ff";
           ctx.beginPath();
           ctx.arc(300, 100, 80, 0, Math.PI * 3/2);
           ctx.stroke();
       }
   </script>
</head>
<body onload="init()">
    <div>
        <canvas id="canvas" width="500" height="250"/>
    </div>
    <div>
        <canvas id="canvas2" width="500" height="250"/>
    </div>
    <div>
        <canvas id="canvas3" width="500" height="250"/>
    </div>
</body>
</html>
PowerShell で Outlook の送信トレイを探索する
## Outlook の送信トレイ情報を取得する
Function Get-OutlookSentMail
{
   Add-type -assembly "Microsoft.Office.Interop.Outlook" | out-null
   $olFolders = "Microsoft.Office.Interop.Outlook.olDefaultFolders" -as [type]
   $outlook = new-object -comobject outlook.application
   $namespace = $outlook.GetNameSpace("MAPI")
   $folder = $namespace.getDefaultFolder($olFolders::olFolderSentMail)
   $folder.items |
   Select-Object -Property Subject, SentOn, Importance, To, CC, BCC
}

##  特定の期日の間に送信したメールの最初のメールと最後のメールの日時を表示する
Get-OutlookSentMail | Where-Object {$_.SentOn -ge [datetime]"2013/04/1" -and $_.SentOn -le [datetime]"2013/04/30" } | Group-Object {$_.SentOn.Day} | %{ New-Object psobject -Property @{Day = [int]$_.Name; First = ($_.Group | Measure-Object SentOn -Minimum).Minimum; Last = ($_.Group | Measure-Object SentOn -Maximum).Maximum } } | Select-Object Day, First, Last  | Sort-Object Day
PowerShell はシンタックス ハイライト未対応...
有向グラフ (DGML) の研究 : 1
有向グラフとは
Visual Studio のコード依存関係などの表示に使われるもので、英語では "Directed Graphs" と呼んでいる。
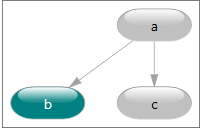
Directed Graphs を記述するための XML ベースのマークアップ言語が定義されており、これを DGML と呼ぶ。具体的な DGML の例を次に示す。
<?xml version='1.0' encoding='utf-8'?>
<DirectedGraph xmlns="http://schemas.microsoft.com/vs/2009/dgml">
  <Nodes>
    <Node Id="a" Label="a" Size="10" />
    <Node Id="b" Background="#FF008080" Label="b" />
    <Node Id="c" Label="c" Start="2010-06-10" />
  </Nodes>
  <Links>
    <Link Source="a" Target="b" />
    <Link Source="a" Target="c" />
  </Links>
  <Properties>
    <Property Id="Background" Label="Background" DataType="Brush" />
    <Property Id="Label" Label="Label" DataType="String" />
    <Property Id="Size" DataType="String" />
    <Property Id="Start" DataType="DateTime" />
  </Properties>
</DirectedGraph>
参考文献
DGML を作成するための APIs
API による記述例
なぜかどこにもサンプル コードがないが、次のように記述することで上記相当の DGML を生成することができる。
using System;
using System.Windows.Media;
using Microsoft.VisualStudio.GraphModel;

namespace AzukiPochette.Sample.Dgml
{
    class Program
    {
        static void Main(string[] args)
        {
            Graph graph = new Graph();

            GraphPropertyCollection properties = graph.DocumentSchema.Properties;
            GraphProperty background = properties.AddNewProperty("Background", typeof(Brush));
            GraphProperty size = properties.AddNewProperty("Size", typeof (String));
            GraphProperty start = properties.AddNewProperty("Start", typeof (DateTime));

            GraphNode nodeA = graph.Nodes.GetOrCreate("a");
            nodeA.Label = "a";
            nodeA[size] = "10";

            GraphNode nodeB =  graph.Nodes.GetOrCreate("b");
            nodeB.Label = "b";
            nodeB[background] = new SolidColorBrush(Color.FromArgb(0xFF, 0x00, 0x80, 0x80));

            GraphNode nodeC = graph.Nodes.GetOrCreate("c");
            nodeC.Label = "c";
            nodeC[start] = new DateTime(2010, 6, 10);

            graph.Links.GetOrCreate(nodeA, nodeB);
            graph.Links.GetOrCreate(nodeA, nodeC);

            graph.Save(@"C:\works\Sample.dgml");
        }
    }
}
(2013.01.27 追記) : github:gist に公開しました。
Enterprise Architect Add-in Project Template for VS2012
Visual Studio 2012 向けに Enterprise Architect アドインを作成するためのテンプレートを作成した。 プロジェクトを作成するだけで、アドイン作成で必要となるメニューなどの最低限のメソッド実装に加えて、登録用のレジストリも合わせて作成してくれる。
想定している使用者
- アドイン作成入門セミナーに参加したことがある初心者
- アドインを頻繁に作成する開発者
3 minutes cooking!
プロジェクト テンプレートのインストールから実際に作成されるまでの工程を 3 分動画にまとめたので、youtube にアップ。
3 minutes cooking / Sparx EA AddIn Project Template for Visual Studio 2012
ダウンロード先
Google Drive で共有したので、使ってみたい方はこちらからどうぞ。
Sublime Text 2 を使うためのメモ
Download
有償で $49。機能制限はないが、試用中 (UNREGISTERED) の間は保存のタイミングで支払を勧めるダイアログが表示される。
Package Control をインストールする
Package (拡張機能) を手軽に管理するために "Package Control" をインストールする。 [View] - [Show Console] を選び、表示された入力エリアに次のコマンドを入力する。
import urllib2,os;pf='Package Control.sublime-package';ipp=sublime.installed_packages_path();os.makedirs(ipp) if not os.path.exists(ipp) else None;open(os.path.join(ipp,pf),'wb').write(urllib2.urlopen('http://sublime.wbond.net/'+pf.replace(' ','%20')).read())
日本語環境を整える
Shift-JIS に対応させる
要望はされているが現在は未対応 (http://sublimetext.userecho.com/topic/46359-please-support-shift-jis-encoding-japanese/) ファイルを開いた際に UTF8 に変換し、保存時に Shift-JIS に戻す "ConvertToUTF8" があるので、これを使う。
IME をインラインで変換できるようにする
[Install Package] で [IMESupport] をインストールする。
Theme
[Install Package] で "Soda Dark"。
[Settings - User]
{
    "font_face": "Source Sans Pro",
    "font_size": 11.0,
    "ignored_packages":
    [
        "Vintage",
        "ZenCoding"
    ],
    "indent_to_bracket": true,
    "smart_indent": true,
    "tab_size": 4,
    "theme": "Soda Dark.sublime-theme",
    "translate_tabs_to_spaces": true,
    "use_tab_stops": true
}
参考
VMWare Workstation を使用して kernel debug をする
前準備
仮想マシンを設定する
- パワーオフされていないマシンにはハードウェアが追加できないため、仮想マシンがパワーオンの場合はシャットダウンする
- ハードウェアの追加で [シリアル ポート] を追加する
- [シリアルポートの種類] で [名前付きパイプに出力する] を選択
- [ソケットの指定] に次のように設定する
- <適当な名前> (たとえば \.\pipe\win8x86)
- [この端末はサーバーです。] を選択
- [接続先はアプリケーションです。] を選択
- 入出力モードで [ポーリングで CPU を開放する] にチェックする
注意 : VMWare の初期設定では、シリアル ポート1 はプリンタが使用しているので、シリアル ポート2 以降が使用される
Windows を設定する
管理者権限でコマンド プロンプトを開き、次のコマンドを入力する。設定完了後は PC を再起動すること。
bcdedit /debug on
bcdedit /dbgsettings serial debugport:2 baudrate:115200
:: 再起動する場合は下記のコマンドを実行
shutdown /r /t 0
デバッグの開始
WinDbg を使用してデバッグをする場合には、コマンド プロンプトを開き、次のように入力する。
windbg -k com:pipe,port=\\.\pipe\win8x86,resets=0,reconnect
Enjoy kernel debug!
Markdown syntax examples
Ref
- http://staff.hatenablog.com/entry/2012/09/19/153219
- http://github.github.com/github-flavored-markdown/
Header
H1
H2
H3
H4
H5
H6
Paragraph
first paragraph.
second paragraph.
third
paragraph.
Code
Multi line
var s = "Hello World";
Console.WriteLine(s);
Inline
this is code.
contains backtick (`) code
Lists
Unorderd list
- a
- b
- b-1
- b-1-1
- b-2
- b-1
- c
Ordered list
- a
- b
- c
Blockquotes
quoted paragraph.
other paragraph ...
Horizontal Rules
Links
Manual
Automatic
Follows
Emphasis
Emphasis
Strong
Images

Escape
*No emphasis*
- No list
Syntax highlighting
require 'redcarpet'
markdown = Redcarpet.new("Hello World!")
puts markdwon.to_html
table
| Left align | Right align | Center align |
|---|---|---|
| This | This | This |
| column | column | column |
| will | will | will |
| be | be | be |
| left | right | center |
| aligned | aligned | aligned |